
 |
.jpg) |

Check out Cassie at Hi Sugarplum!'s perfectly hung grouping of travel photos. She didn't even use a level! Apparently, she has some crazy sixth sense for spacing.
 |
| Hi Sugarplum! |
Here is a quick and easy tip to hang groupings straight every time.
(This also works for hanging single pieces that have two hangers on the back).
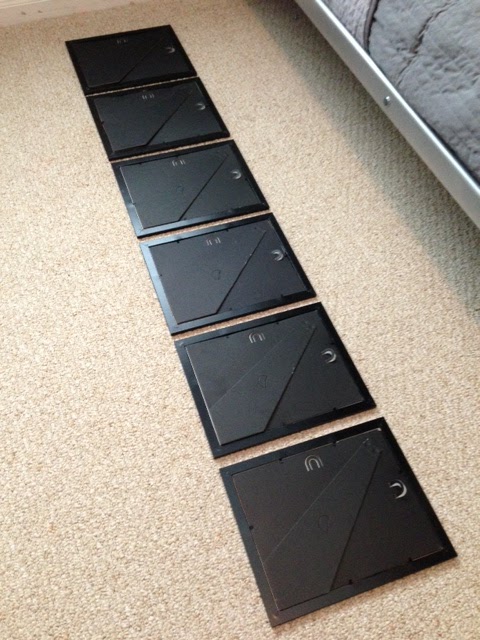
1. Lay out the items to be hung face down in a straight line.
2. Adjust your spacing. Be sure not to space items too far apart. The grouping should read as a single unit. I did about an inch here, but spacing really depends on the size of the pieces and the size of the area you are trying to fill.


3. Once you are happy with the layout, stretch a piece of masking tape across the whole grouping. You want to start at the edge of the first piece and end at the edge of the last piece. The tape should be applied directly on top of the hangers.
4. Next, draw a dot or punch a whole through the tape in the middle of the hanger. This is where your nails will go.

5. Carefully remove the tape from the pictures being sure not to tear it.
6. Stick the tape on the wall where you will want the pictures to hang. Remember that the tape line is where the hangers will line up, not the top of the frames. Make a mental note (or measure if you must) of the distance and allow for that distance above your tape line to the tops of the frames.
7. Since your tape spanned the entire length of the grouping, you can center it on the wall as needed. This is a good time to bust out the level. It just so happens that my walls have horizontal stripes which made it easy for me.
8. The dots or holes that you punched on your tape are where to hammer your nails. Simply hammer your nails right on top of the tape.

8. Once you have the nails in the wall, remove the tape and get to hanging.
If you are hanging multiple rows, you can reuse the tape ( being extra careful when removing it) over and over for all of the rows below.
No comments:
Post a Comment
I love to hear your feedback!
Thanks:)