Showing posts with label Quick Tip. Show all posts

July 16, 2013

Quick Tip Tuesday - A Place for Hair Bows and Headbands

Any little girl mama's out there can probably relate to the massive amount of hair accessories that comes with having a daughter.  They usually end up everywhere and you can never find the one that you are looking for.

We have tried hanging bows from ribbons and shoving headbands into drawers only to be constantly frustrated.  That was until about a year ago when I finally found a solution that works for us!


An over the door shoe organizer now holds ALL of Sis's hair accessories and keeps them organized! The fact that this one is see through makes finding what we are looking for a breeze.  Everything is grouped together by color.  I think it actually looks kind of cute.  (Of course I would think that because I happen to love both organization and hair bows;). 


The fact that headbands actually fit in the pockets has literally solved all of our first world hair accessory problems.  I found this particular organizer at Wal-Mart.   You can find it here.


This has eliminated a huge stressor from our morning routine.  I hope it can work for you too!


July 01, 2013

Quick Tip Tuesday - Using Fabric Markers to Color Match


I scored these awesome Robert Allen's Khanjali fabric pillows at Homegoods last week.  All though they are not outdoor pillows, I knew that I had to have them for my back patio.


Unfortunately, they only had two pillows in this fabric and I didn't find any others that worked as coordinates.  I needed at least two more.  In addition to these two chairs, I also have a loveseat that needed a little pillow love too.

I went to Homegoods, TJ Maxx, Marshalls, Pier 1, Tuesday Morning, Target and World Market looking for coordinating pillows only to come out empty handed.  Yes, I really did go to all of those stores.  What is even more disturbing is that I visited multiple locations of some of them.   I admit it, I have a problem.  

Normally, when I can't find exactly what I am looking for at the stores, I just make it myself.  This time, I was completely unmotivated to sew anything.  Just when I thought I might have to resort to making pillows myself, I remembered the last time I was in Garden Ridge, they had a huge pillow department.  Yeah, they are pretty crappy quality, but I didn't care at this point.  I headed there and unlike the other 75 stores I searched, Garden Ridge did not disappoint.  I found these cute pillows in almost the exact colors of my Robert Allen pillows. Did I mention that they were on sale for $6??  


Looking at the pillows in the pictures, they look like they match just fine.   Most people would have been totally okay with them the way they were.  It seems that I have this color matching disorder.  I get fixated on colors not being "just right"  Every time I looked at the new pillows, I saw pale, smokey blue as opposed to the more vibrant turquoise that I was seeing in the original pillows.


Nothing I buy or put in my house is above getting a little tweak or makeover.  I decided I would make the new pillows exactly the color I wanted using a turquoise fabric marker.


I basically scribbled over the blue flame stitch pattern until I got the vibrant color I was looking for.  Because the pattern wasn't perfect, I didn't have to be either.


Now the pillows look like this...

The marker is permanent fabric dye so it should hold up just fine.

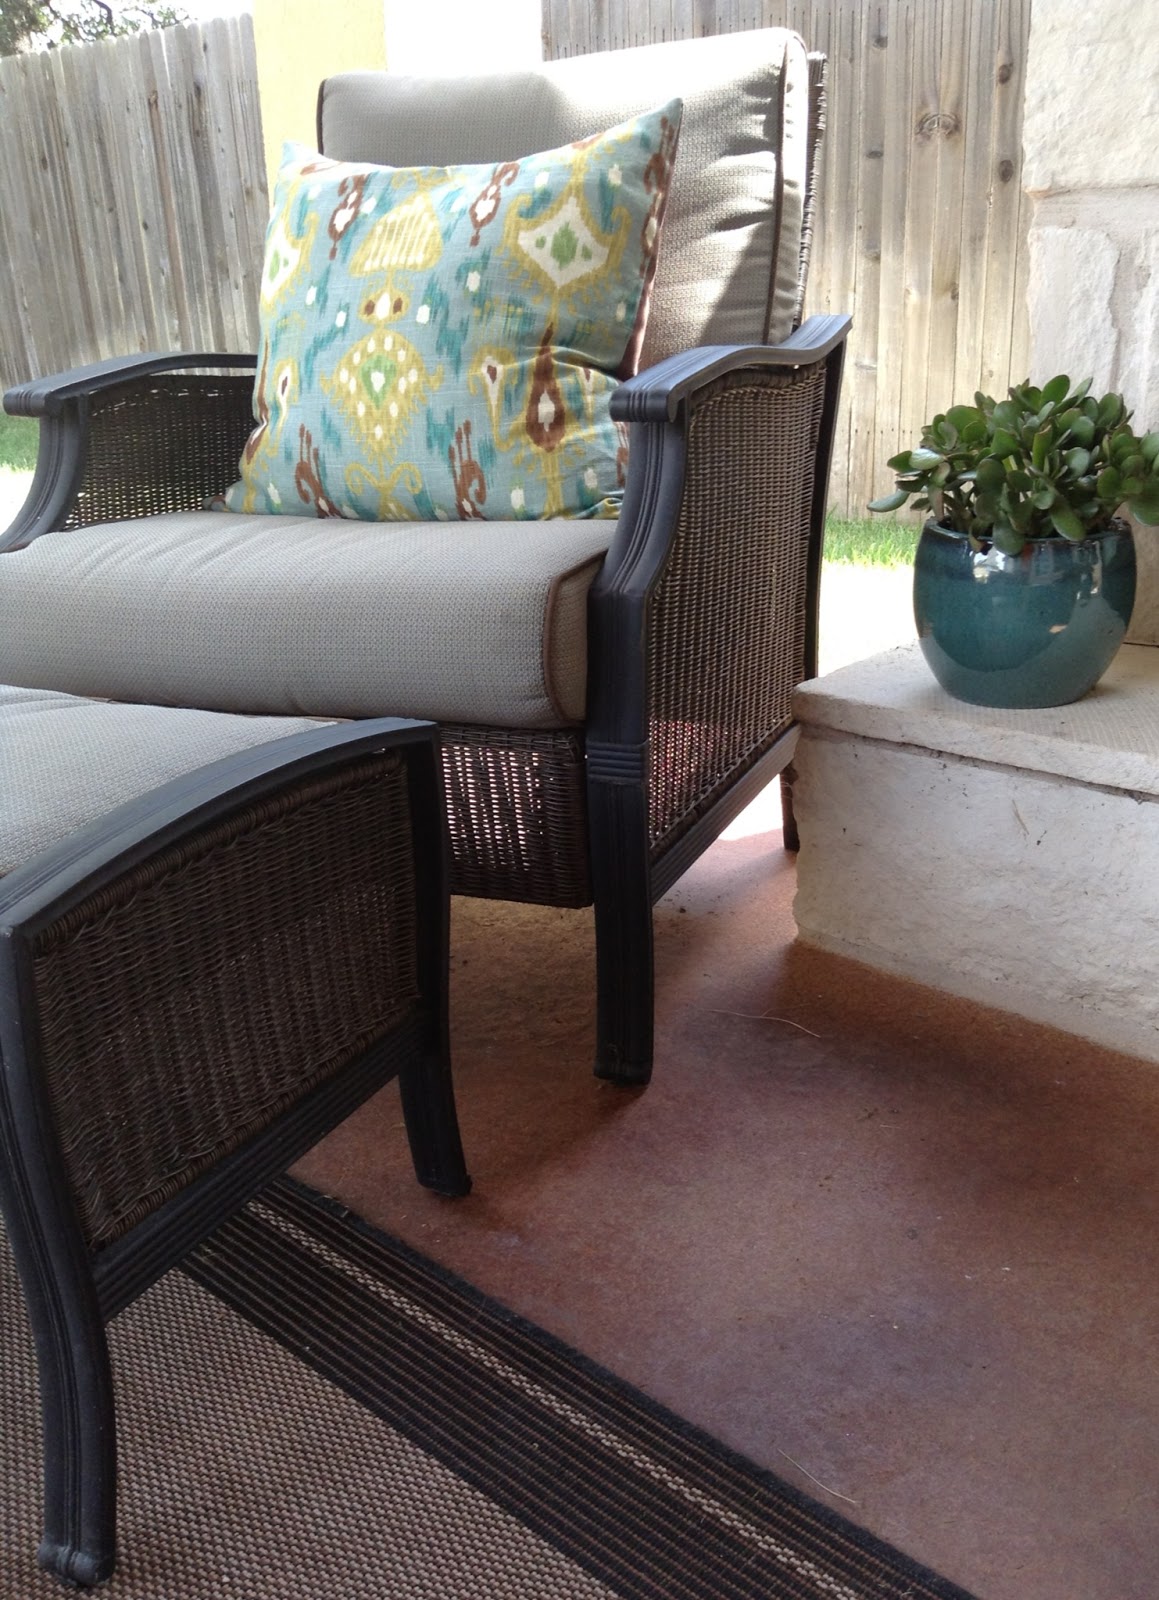
Here they are on the loveseat.


And once again here is the fabric that started it all.


I love how the colors and patterns work together now.  I am sure that I will find more opportunities to use fabric markers.  This little trick will open up a ton of possibilities.  


May 14, 2013

Quick Tip Tuesday - How to Hang Symmetrical Groupings

Hanging pictures or mirrors in groups can make a great impact.  It is one of my favorite ways to fill a large space without investing in one single piece.  


Pinterest
It also gives you the ability to incorporate many different colors and subject matters. 
Pinterest

Groupings can be hung vertically or horizontally.   Making sure they have equal spacing and are all hung straight and level can be a challenge.


Check out Cassie at Hi Sugarplum!'s perfectly hung grouping of travel photos.  She didn't even use a level!  Apparently, she has some crazy sixth sense for spacing. 
Hi Sugarplum!
So what about the rest of us?  There is always the option of measuring.  It is simple, you measure the width of the picture, divide it by 2, add how many inches apart you want them to be.....WHATEVER!!!!!!   Forget that math crap!

Here is a quick and easy tip to hang groupings straight every time.  
(This also works for hanging single pieces that have two hangers on the back).


1.  Lay out the items to be hung face down in a straight line.  

2.  Adjust your spacing.   Be sure not to space items too far apart.  The grouping should read as a single unit.  I did about an inch here, but spacing really depends on the size of the pieces and the size of the area you are trying to fill.  


3.  Once you are happy with the layout, stretch a piece of masking tape across the whole grouping.  You want to start at the edge of the first piece and end at the edge of the last piece.  The tape should be applied directly on top of the hangers.  

4.  Next, draw a dot or punch a whole through the tape in the middle of the hanger.  This is where your nails will go.


5.  Carefully remove the tape from the pictures being sure not to tear it.  

6.  Stick the tape on the wall where you will want the pictures to hang.  Remember that the tape line is where the hangers will line up, not the top of the frames.  Make a mental note (or measure if you must) of the distance and allow for that distance above your tape line to the tops of the frames.

7.  Since your tape spanned the entire length of the grouping, you can center it on the wall as needed.  This is a good time to bust out the level.  It just so happens that my walls have horizontal stripes which made it easy for me.  

8.  The dots or holes that you punched on your tape are where to hammer your nails. Simply  hammer your nails right on top of the tape.


 8.  Once you have the nails in the wall, remove the tape and get to hanging.

If you are hanging multiple rows, you can reuse the tape ( being extra careful when removing it) over and over for all of the rows below. 


April 24, 2013

Quick Tip Tuesday- Peace Out Paint Rollers


I have painted more than my fair share of rooms in my lifetime.  I have a major love/hate relationship with painting.  It is by far the quickest and least expensive way to transform a space, but it can also be a huge pain in the arse.  Because I have a short attention span and thrive on instant gratification, I like to get things done as fast as possible.  Painting can be time consuming so I am always looking for a shortcut.

When painting large areas, most people use a paint roller.  I despise them!  I find them really messy and I always end up splattered in paint by the time I am finished.  They don't really give you even coverage so you almost always have to do two coats of paint.  With so many projects on my to do list, I certainly ain't got time for that!

So I have ditched all of my rollers and I now only use paint pads.
Home Depot

They are SO much easier!  The paint goes on evenly and I rarely have to do a second coat.  They use much less paint too.  This week, I painted an entire 11'x12' bedroom and only needed one gallon.

For a while, the pads were hard to find.  I would get them at Wal-Mart (where I first discovered them) and later found them at Home Depot.  Now they have them at Lowe's too.  You have to make sure you are getting the "PAINT" pad and not the "DECK" or "STAIN" pad.


I hope this quick tip makes your next painting project easier.  Stay tuned for more!